Thinking about listing your Walnut Creek Estates home and want buyers to feel the lifestyle the moment they step in? In a golf community, presentation is everything. You want your home to show light, polished, and oriented to the course and outdoor living. In this guide, you’ll learn practical staging priorities tailored to 27534 that help your home photograph beautifully, stand out online, and show its best in person. Let’s dive in.
Why staging matters in Walnut Creek Estates
Luxury buyers are shopping for a lifestyle as much as a property. They look for easy indoor and outdoor flow, strong natural light, and views that invite relaxation or entertaining. When your staging highlights these features, your photos and video feel consistent with the in-person tour.
Staging also sets the tone for high-end media. If each space is prepared for camera angles, lighting, and walk-through shots, your listing will hold attention online and drive more qualified showings.
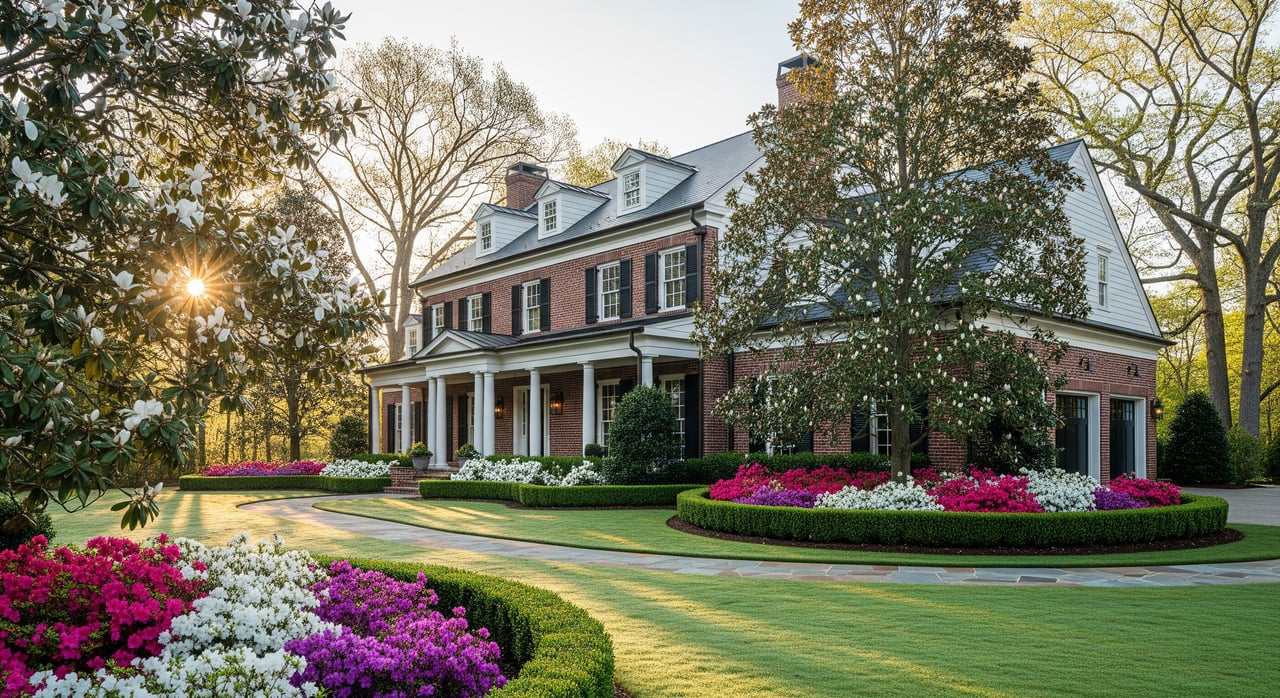
Prioritize entry impact
Your entry sets expectations for the rest of the tour. Keep it polished and proportionate.
- Remove personal items and opt for restrained decor, such as a console with a single art piece or a large mirror and a pair of matching lamps.
- Touch up paint on the front door and trim; ensure flooring and thresholds look flawless.
- Add symmetrical, scale-appropriate planters for a grand, balanced look.
- Confirm the foyer fixture is clean and bright, and that it can be turned on for evening showings and twilight photos.
Light every room right
Lighting drives mood and images. Aim for a bright, consistent look in photos and in person.
- Maximize natural light by opening curtains, removing heavy drapes, and trimming shrubs that block windows.
- Layer ambient, task, and accent lighting to add depth. Think ceiling lights, under-cabinet lighting, and picture lights.
- Use consistent bulb color temperature throughout each space, warm to neutral is usually best. Avoid mixing cool and warm bulbs in the same room.
- Add dimmers to key fixtures so your photographer can fine-tune brightness for twilight shots.
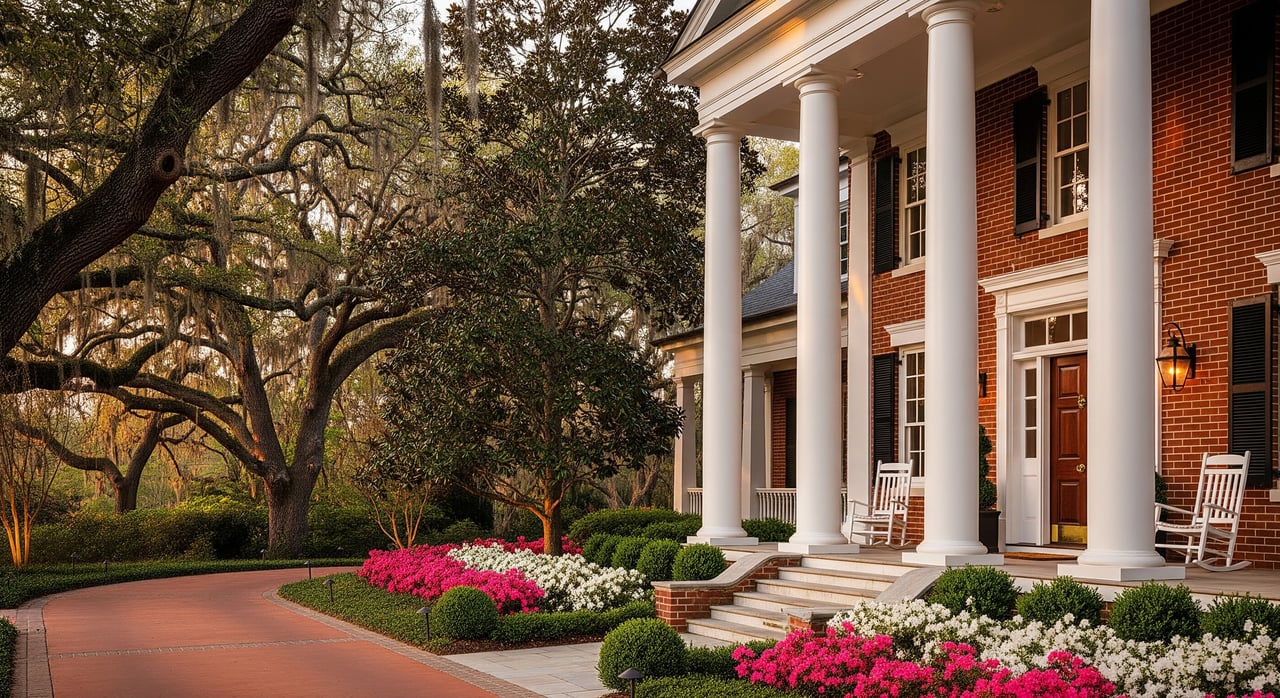
Make the golf view the star
If you have fairway or lake views, make them the focal point.
- Orient main seating toward the view and keep furniture low near windows to preserve sightlines. A glass coffee table or low sofas work well.
- Remove bulky window treatments. Use simple panels that frame rather than block the scenery.
- On patios or verandas, choose scale-appropriate furniture, an outdoor rug, and tidy plantings that do not obstruct the view.
- Highlight transition points like sliding doors or sunrooms so buyers can imagine morning coffee or evening gatherings outside.
Stage outdoor living
Show buyers how the backyard functions across the day and seasons.
- Define clear zones for lounging, dining, and grilling, with a smooth path to outdoor amenities.
- Use weather-friendly textiles and keep accessories simple and low maintenance.
- Remove garden hoses, secure pool equipment, and hide trash bins from view.
- For night staging, add subtle path lighting and warm porch lights to create a welcoming glow for twilight images.
Room-by-room quick wins
Primary suite
- Keep the palette calm and neutral. Use minimal furniture and neatly staged nightstands.
- Declutter closets to show organization and space. Aim for half full, with items neatly hung.
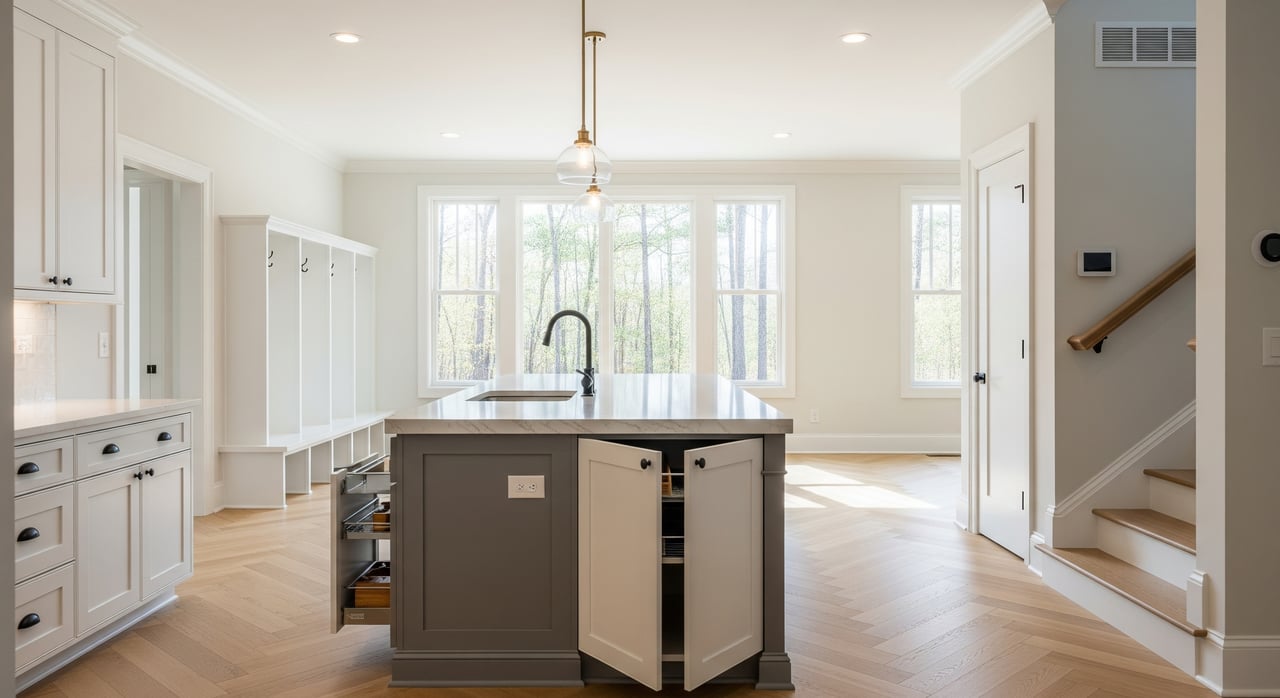
Kitchen
- Clear counters and feature one or two high-end items, such as a bowl of fresh lemons or a cookbook.
- Set the table or island to show scale and flow. Keep appliances spotless and make work zones obvious.
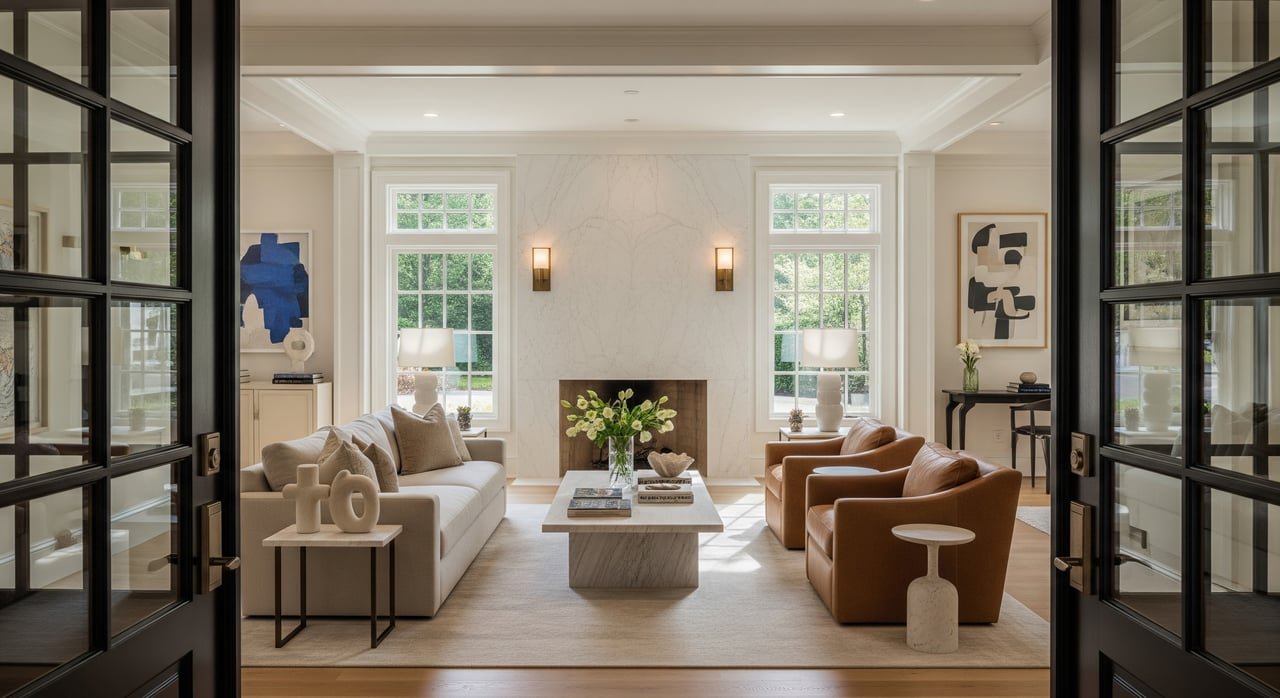
Living and dining areas
- Right-size furniture to the room. Remove extra pieces to create breathing room.
- Orient seating to the view or fireplace, whichever is the stronger focal point.
Home office or media room
- Tidy cables and keep surfaces clean. Show built-ins and any sound control features if present.
- Stage a simple, functional desk or a tidy media setup that reads as organized.
Garage and utility spaces
- Showcase organization systems. Remove vehicles for photos if possible.
- Keep floors clear and storage neat so these spaces read as useful, not overflow.
Materials and color strategy
Neutral, layered textures read as high end and photograph beautifully. Natural woods, linen, and leather add depth without distraction. Avoid overly trendy colors and lean on subdued accents in pillows or art. Keep high gloss surfaces spotless to prevent distracting reflections in photos.
Small upgrades with big ROI
- Book a professional deep clean, including windows and tracks.
- Refresh paint in high-traffic areas with neutral tones.
- Replace dated fixtures in key rooms, especially the entry and over the kitchen island.
- Refresh landscaping with trimmed hedges, clean mulch, and seasonal plantings.
- If budget is tight, stage key areas first. Focus on the entry, living room, kitchen, primary suite, and the primary outdoor space.
Prep for high-end media
Great media sells the lifestyle. Coordinate staging with your photographer and videographer so the look is consistent online and in person.
Twilight photography
Twilight images create drama, showcase exterior lighting, and help your listing stand out. Plan for blue hour just after sunset. Make sure landscape and exterior lights are working and clean. Select interior lights should be on with consistent color, and rooms visible through windows should be tidy.
Video tours and walk-throughs
Video reveals flow and scale in ways still photos cannot. Clear pathways for smooth movement and remove anything that reflects or shifts during filming. Coordinate timing for early morning or late afternoon light, and consider adding exterior twilight sequences.
Suggested sequences include the approach to the entry, a sweep from the living space to the view, a kitchen workflow segment, primary suite to bath, and a terrace or backyard vignette that shows lifestyle.
Drone and aerial imagery
Aerials help buyers understand lot context, proximity to the clubhouse, and course views. Before scheduling, confirm HOA or club rules and FAA compliance for commercial drone work. Tidy the exterior, remove vehicles and trash, and coordinate if shared amenities will appear in the frame.
Virtual staging vs. physical staging
Virtual staging can help with vacant or secondary rooms, but luxury buyers expect authenticity during showings. If you use virtual images, disclose them clearly and follow MLS rules. For main living areas, physical staging is the stronger choice.
Media deliverables to request
- High-resolution still photos, including interior and exterior twilight options
- Aerial photos and a short aerial video clip
- A 1 to 2 minute cinematic video, with an optional 5 to 8 minute detailed walkthrough
- A floor plan and a 3D or virtual tour
- Short social video cutdowns for promotion
6-week prep calendar
Use this as a template and adjust to your schedule.
- Week 6: Planning and decisions
- Confirm the listing strategy and staging budget.
- Book the stager, photographer, videographer, drone operator, and cleaning crew.
- Review HOA and community rules for signage, drone use, and exterior changes.
- Walk the property with your stager or photographer to identify repairs and furniture moves.
- Week 5: Repairs and deep projects
- Complete small repairs, such as door hardware, trim, cracked tiles, and outlets.
- Tackle any paint or cabinet touch-ups that will impact photos.
- Begin landscaping, including pruning, mulch, and potted plants.
- Week 4: Declutter and initial cleaning
- Remove personal items and excess furniture. Consider short-term storage.
- Deep clean carpets, windows, and grout.
- Organize closets and the garage as needed.
- Week 3: Staging and lighting
- Install staged furniture and accessories in key rooms.
- Replace dated fixtures, match bulb color, and add dimmers where helpful.
- Finish landscaping and exterior cleaning.
- Week 2: Final prep and walkthrough
- Schedule final cleaning after staging is in place.
- Do a complete photo and video walkthrough with the stager to refine sightlines.
- Dress strategic areas with flowers, fresh towels, and outdoor cushions.
- Week 1 and Day 0: Media and launch
- Capture twilight and exterior photos at scheduled times.
- Complete drone and video sequences, as permitted.
- Upload media to MLS and marketing channels, then schedule showings.
Quick checklists
- Entry: Clear floor, polished hardware, working lights, matched planters.
- Windows: Clean panes inside and out, clear tracks, aligned blinds.
- Counters: One or two curated items only.
- Closets: No more than half full, neatly hung.
- Garage: Organized and photo-ready.
- Pets: Remove litter boxes, food bowls, and odors.
Before and after snapshots
Use these scenarios to guide your changes.
- Entryway
- Before: Personal photos, mail piles, mismatched shoe rack, dim bulb.
- After: Console with art, pair of lamps, right-size rug, fresh front door paint, two matching planters.
- Living room to fairway view
- Before: Oversized sectional blocking windows, heavy drapes, cluttered surfaces.
- After: Low-profile sofa to showcase windows, neutral rug, minimal coffee table decor, drapery pulled back to frame the view.
- Patio or veranda
- Before: Stored tools, faded cushions, unkempt plantings.
- After: Coordinated furniture, outdoor rug, clean grill, subtle landscape lighting, simple pillows and lanterns.
- Primary suite
- Before: Nightstands full of personal items, laundry hamper in view.
- After: Fresh neutral linens, minimal accessories, decluttered furniture, open sightline to any balcony or view.
Ready for a tailored plan?
If you would like a property-specific plan, request a complimentary staging consult. Expect a 30 to 45 minute on-site or virtual review, a prioritized checklist, a sample staging plan, and a media timetable aligned to your launch date. For Walnut Creek Estates, we also help you confirm HOA guidelines and plan any drone or twilight sessions the right way.
You deserve steady, local guidance that keeps your sale on track. Reach out to Arnie Jones to schedule your complimentary consult.
FAQs
What rooms should I stage in a Walnut Creek Estates luxury listing?
- Focus on the entry, kitchen, main living area, primary suite, and the main outdoor living space for the best return.
When should I schedule twilight photos for my 27534 home?
- Plan for blue hour just after sunset, with exterior and selected interior lights on and color-consistent, and coordinate timing with your photographer.
Can virtual staging replace physical staging for a luxury property?
- Virtual staging can help with secondary or vacant rooms, but physical staging is preferred for authenticity and showings, and virtual images should be clearly labeled per MLS rules.
Will staging delay my listing in Walnut Creek Estates?
- Allow 2 to 6 weeks, depending on repairs and vendor availability, and use a simple prep calendar to keep tasks on schedule.
Are there special rules for drone photos over the golf course?
- Yes, confirm HOA and club restrictions and use a certified operator who complies with FAA Part 107 before scheduling aerial imagery.